Here is a perfect nose contouring guide that covers all the important steps. Plus, exclusive tips and tricks are included as a bonus!
Are you ready to upgrade your makeup skills for a nice, flawless contoured nose? Then, you are just in the right place now! This nose contouring guide will help you clear your confusion and learn everything about it. Read along.
Why is Nose Contouring So Important?

Did the word “contour” confuse you? If it did, then don’t be! It is just a way to outline the features of your face to give it the shape or form. Additionally, it has become an essential part of makeup techniques. But why?
It allows for improving the facial features in a way that is so flawless and natural that it gives the makeup an immaculate finish. The most focused area is the “nose.”
This technique helps give dimension to the nose, like naturally! It highlights the outline and tip of the nose to mimic the effect of shadow and light in that area, giving the illusion of a balanced and defined nose shape.
The Step-By-Step Nose Contouring Guide in 6 Steps!
1. Select the Right Products
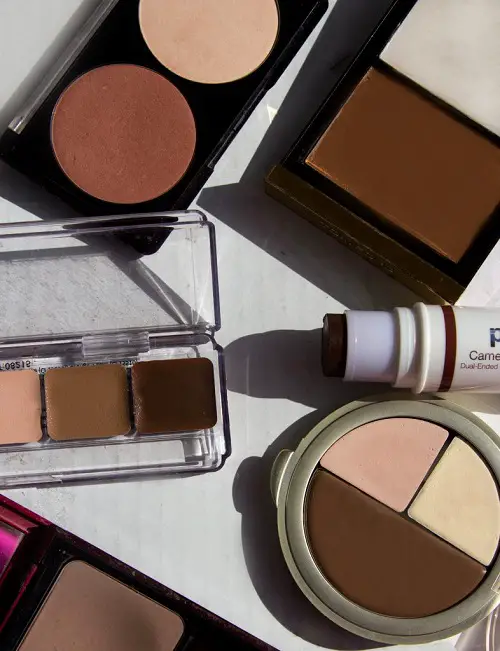
The top-most important things are the contour and highlighter shades. Select one that is two shades darker than your skin for the contour, and two shades lighter than your skin for the highlight.
Then you need a formulation like a cream or powder product. Look for one that has a more natural finish and blends easily.
Don’t forget to grab the blending tools–a small, dense brush or a makeup sponge, and lastly, the setting powder.
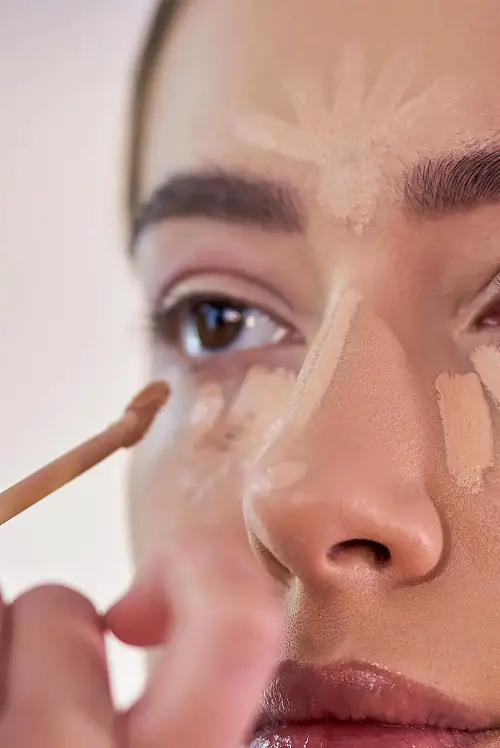
2. Start with a Clean Base

Well, this is the basic step to begin with whenever you apply makeup. Prep your skin with a good moisturizer, apply primer wherever necessary, and then set up the base with a foundation of your choice.
Blend it to cover your face well enough and go through the next step. You can use a little amount of loose powder to set the foundation properly before contouring.
3. Map the Contour Lines
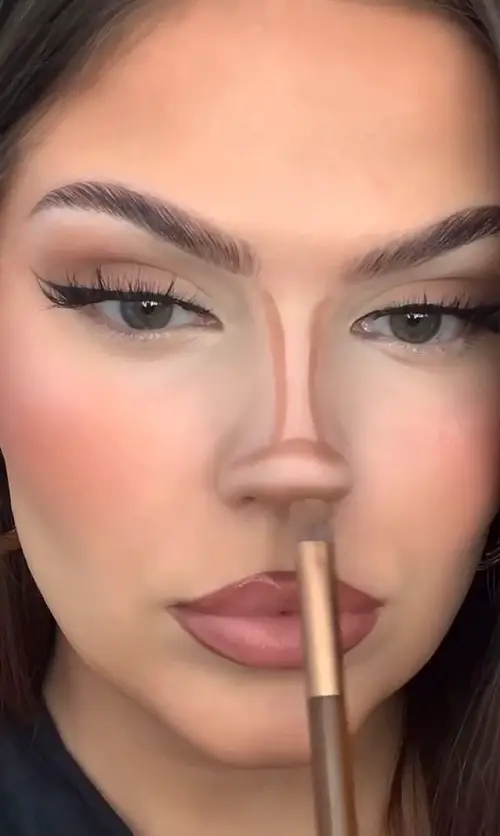
Use a small angled brush and a matte contour shade. Draw two straight lines from the inner corners of your brows down along the sides of your nose. The closer the lines, the slimmer the nose appears!
However, if you’re a beginner, avoid using too much product. It is better to add more later than to smudge off the extras.
Add a small horizontal line at the tip of the nose if you want a more upturned appearance.
You can also put a little shadow on the bottom sides of the nostrils if you want to reduce the flared look.
4. Highlight the Center
Use a lighter concealer or highlighter for this step. Then just glide a thin, straight line down the bridge of the nose and in between the contour lines, of course. Lastly, add a tiny dot on the tip to enhance a lifted look.
5. Blend, Blend, Blend!

This is going to be your favorite part! Grab a small, fluffy brush or a damp sponge to blend the contour lines that you have made just now. Try blending the lines inward, toward the bridge of your nose.
Then go for the highlights, blend the highlighted lines to soften any harsh lines while also maintaining the central brightness. That’s it!
6. Set with Powder (Optional)

Now, this is very simple. If you want your makeup to stay where you have blended it, don’t ever skip this step. This is what will help your makeup stay put, especially in hot weather!
So set the contour and highlight with a translucent or skin-toned powder to keep it long-lasting. You can also lightly bake the sides of the nose using loose powder for extra sharpness, then dust it off after 5–10 minutes.
So, that’s all for the perfect nose makeup, but hey, do you want to learn how to contour your face? Check out this guide asap!